To view the Status Buttons, you need to click the contact record to update the form.

Select the Status Button appropriate for the type of business you’re working on eg. If you’re doing Mortgage Protection, choose the Life Status Update Button.
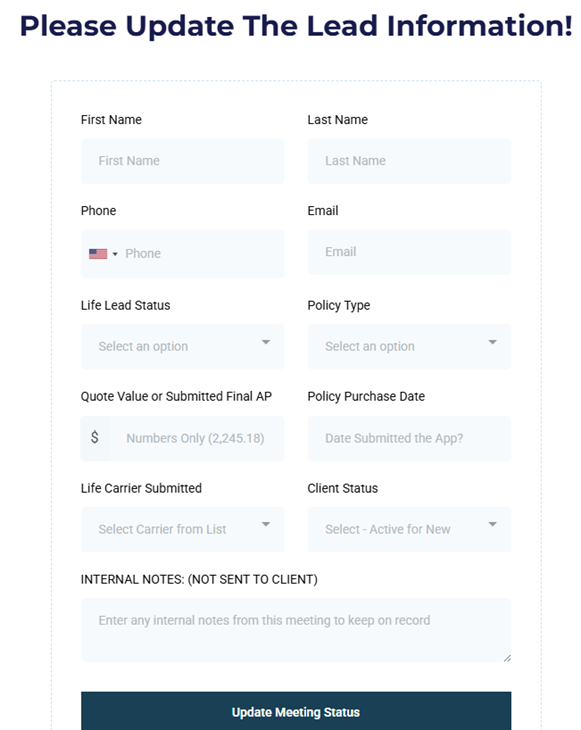
Use the Status Button to update during or after the call, each lead status will be moved and updated to appropriate disposition column in the Opportunity Pipeline.
Form has a lot of automations associated with it and they should use every time you have interaction with your client.
You should not Drag and Drop leads between the various pipelines otherwise you lose the benefit of all the automations the system has built in.
First and Last Name: Auto-populated
Life Lead Status: Different Dispositions you’re putting your lead in. Examples: No Answer, Appointment Set, Application Approved, etc.
Policy Type: Kind of policy you’re talking to them about.
Quoted Value: Free form. You can put in the annualized premium of the policy you’re selling.
Policy Purchase Date: Use this to select the date the application was submitted.
Life Carrier Submitted: Use to select the Life Insurance Carrier. You can also add Carriers if a Carrier is not on the list.
Client Status: All clients from the start are active. In this particular section, let’s say that the client did not pay their monthly payment, you can click here Lapse Pending. The system is automatically going to notify the Client that they need to make their monthly payment through an automation.
Internal Notes Section: Anything entered here will be added to the notes section in the client contact record and is not sent to the client.
Conversation Recap Notes: If you type up a recap of your conversation and select “Yes” to send an email, it will send the email to the client.